
How to Install Garden Lights: Step-by-Step
Jul 24, 2025
Installing garden lights can transform your outdoor space into a magical oasis, providing both functionality and aesthetic appeal. Whether you're looking to highlight a beautiful flower bed, illuminate a pathway, or create a cozy ambiance for outdoor gatherings, garden lights are a great addition. This step-by-step guide will walk you through the process of installing outdoor garden lights, ensuring a seamless and efficient setup.

Before you dive into the installation process, it's essential to understand the basics of garden lighting. This involves choosing the right type of lights, understanding the layout, and preparing the necessary tools and materials. Familiarizing yourself with these elements ensures that your lighting setup will not only be functional but also enhance the aesthetic appeal of your garden. Moreover, a well-informed approach minimizes installation errors, which can save time and resources.
Garden lighting is not just about placing lights randomly; it's about creating a harmonious balance between light and shadow that complements your garden's natural features. Understanding the interplay of light and landscape can help you highlight focal points, enhance safety, and create a warm and inviting atmosphere for evening gatherings. Considerations such as light intensity, color temperature, and beam angle can significantly impact the overall effect of your garden lighting.
Types of Garden Lights
There are several types of garden lights, each serving a unique purpose:
1. Path Lights: Ideal for illuminating walkways and driveways, path lights ensure safety and guide visitors through your garden. They come in various styles, from sleek modern designs to more traditional options, allowing you to match them with your garden's theme. Path lights are generally low in height and can be spaced evenly along the edge of walkways for continuous illumination.
2. Spotlights: Used to highlight specific features like trees, sculptures, or architectural elements, spotlights are directional lights that create dramatic effects by casting focused beams. They can be adjusted to different angles to emphasize particular details, making them ideal for showcasing your garden's most striking features.
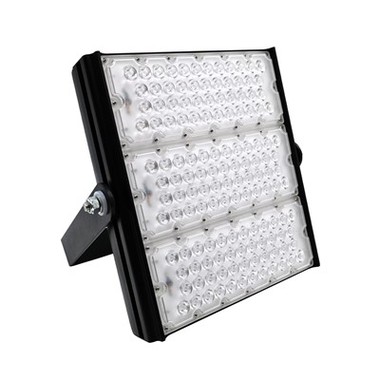
3. Floodlights: Provide broad illumination for larger areas such as patios, garden beds, or open spaces. Floodlights are powerful and can cover wide areas, making them suitable for security purposes as well. They are typically mounted higher up to distribute light evenly over a larger surface.
4. Decor the surface to provide ambient lighting without cluttering the space. They create a warm, inviting atmosphere. Lights: Perfect for illuminating decks and patios, deck lights are usually recessed intphere and are great for highlighting the edges of steps or the perimeter of a deck.
5. String Lights: Great for creating a festive atmosphere, string lights can be draped over trees, pergolas, or along fences. They add a whimsical touch to your garden and are perfect for parties or casual gatherings
Choosing the Right Garden Lights
When selecting garden lights, consider factors like the size of your garden, the type of plants or features you want to highlight, and your overall design preference. Opt for LED lights as they are energy-efficient and have a longer lifespan compared to traditional bulbs. LED lights are available in various color temperatures, allowing you to choose between warm and cool lighting effects to suit different areas of your garden.
Additionally, think about the durability and weather resistance of the lights, especially if you live in an area with harsh weather conditions. Look for lights with a high IP rating, which indicates good protection against dust and moisture. Solar-powered options are also available and can be an eco-friendly choice, reducing the need for extensive wiring and saving on energy costs.
Planning Your Layout
A well-planned layout is crucial for effective garden lighting. Sketch out your garden and mark where you want the lights to be placed. Ensure the layout provides even illumination and complements the existing landscape features. Take into account the natural flow of the garden and how people will move through the space, ensuring that key areas are well-lit.
Consider the placement of power sources and the length of cables needed to connect all lights. It's also a good idea to conduct a test by temporarily placing lights in the desired positions to visualize how the setup will look at night. This step allows you to make adjustments before committing to the final layout, ensuring the end result aligns with your vision.
Tools and Materials Needed
Before starting, gather the necessary tools and materials. Here's a list of what you'll need:
- Garden lights (LED recommended)
- Power drill
- Screwdriver
- Wire connectors
- Cable connectors
- Electrical tape
- Shovel or trowel
- Tape measure
- Voltage tester
- Outdoor extension cord (if needed)
Having the right tools and materials on hand will streamline the installation process and help avoid unnecessary delays. It's worth investing in quality tools, as they will not only make the installation easier but also ensure the longevity of your garden lights. Consider keeping a tool kit dedicated to outdoor projects, making it easy to access whenever you need to perform maintenance or adjustments.

Step-by-Step Installation Process
Now that you have everything ready, it's time to start the installation process. Follow these steps for a successful garden light setup:
Step 1: Prepare the Site
Begin by clearing the installation area of any debris or obstacles. Use a shovel or trowel to dig shallow trenches where the cables will be laid. Ensure the trenches are deep enough to prevent cables from being exposed. This step is crucial for both the aesthetic and functional aspects of your lighting setup, as exposed cables can be unsightly and pose a tripping hazard.
Consider the type of soil in your garden, as rocky or compacted soil may require more effort to dig through. If you encounter roots or other obstacles, take care to work around them to avoid damaging your plants. By preparing the site thoroughly, you ensure a clean and professional-looking installation.
Step 2: Install the Transformer
If your garden lights require a transformer, install it near a power source. The transformer converts the high voltage from your home into a lower, safer voltage suitable for garden lights. Follow the manufacturer's instructions for installation. Position the transformer in a sheltered location to protect it from the elements and ensure it is accessible for future maintenance.
Consider using a weatherproof box or enclosure to house the transformer, providing additional protection against rain or snow. Ensure that the power source can handle the load of all the lights you'll be connecting, and consult a professional if you're unsure about electrical specifications.
Step 3: Lay the Cables

Carefully lay the cables in the trenches, connecting them to the transformer. Use cable connectors to join sections of cable if necessary. Ensure the cables are taut and secure them with stakes if needed. Keeping the cables taut prevents them from shifting or becoming tangled, which can lead to damage over time.
Label each cable if you're connecting multiple lights, as this will make troubleshooting and future adjustments much easier. Avoid running cables under heavy objects or areas where they might be stepped on frequently, as this can lead to wear and tear.
Step 4: Connect the Lights
Attach the garden lights to the cables using wire connectors. Strip the ends of the wires and twist them together, then secure with wire connectors and electrical tape. Ensure all connections are tight to prevent water ingress. Properly sealed connections are crucial for preventing short circuits and maintaining the integrity of the lighting system.
Double-check that the polarity is correct when connecting wires, as reversing it can cause lights to malfunction. If you're unsure about making electrical connections, it may be wise to consult with or hire a professional electrician to ensure safety and compliance with local electrical codes.
Step 5: Position the Lights
Place the lights in their designated spots. Adjust the angle and direction as needed to achieve the desired lighting effect. For path lights, ensure they are evenly spaced to provide consistent illumination. Take time to experiment with different angles and positions to achieve the best possible lighting effect.
For spotlights, consider the shadows they create, as these can add depth and interest to your garden at night. Remember that the goal is to enhance, not overpower, the natural beauty of your garden, so subtle adjustments can make a significant difference.
Step 6: Test the Setup
Once all the lights are connected, turn on the power to test the setup. Use a voltage tester to ensure the lights are receiving power. Adjust the position or angle of the lights as needed to optimize the lighting effect. This step is essential for catching any issues before completing the installation, allowing you to make necessary changes.
Observe the lighting at different times of the evening, as the changing light conditions can affect the overall appearance. Ensure that the lighting is effective without being too harsh or glaring, maintaining a balance that enhances the garden's natural beauty.
Step 7: Bury the Cables
After confirming that everything is working correctly, bury the cables in the trenches. Ensure the soil is firmly packed to prevent any movement or exposure of the cables. A well-buried cable will be protected from weather and foot traffic, extending its lifespan and maintaining the safety and aesthetics of your installation.
Consider marking the location of buried cables on a garden map or plan, as this information will be valuable if you need to perform maintenance or make changes in the future. Taking these extra steps ensures a neat and secure installation.
Safety Tips for Outdoor Light Installation
While installing garden lights is relatively straightforward, it's essential to prioritize safety:
Always turn off the power before working with electrical components.
Use outdoor-rated cables and connectors to withstand weather conditions.
Consider hiring a professional electrician if you're unsure about handling electrical components.
Safety should always be your top priority when working with electricity. Double-check that all components are designed for outdoor use, as indoor-rated products may not withstand the elements. If you're ever in doubt about the safety of your setup, consulting with a professional is a wise investment in both safety and peace of mind
Maintaining Your Garden Lights
Regular maintenance will ensure your garden lights remain functional and beautiful:
- Clean the lights periodically to remove dirt and debris.
- Check for loose connections or damaged cables and repair them promptly.
- Replace any burnt-out bulbs with energy-efficient LED alternatives.
Regular maintenance will not only prolong the life of your garden lights but also ensure that they continue to enhance your outdoor space. Seasonal checks can be a good practice, as they allow you to address any issues before they become significant problems.
Consider setting a schedule for maintenance tasks, such as cleaning lenses and checking connections, to keep your lighting system in top condition. Keeping spare parts on hand, such as bulbs and connectors, can also help you address any issues quickly.
Conclusion
Installing garden lights can enhance the beauty and functionality of your outdoor space. By following this step-by-step guide, you can achieve a professional-looking installation that will impress your guests and provide years of enjoyment. Whether you're highlighting a stunning landscape feature or creating a cozy atmosphere for evening gatherings, garden lights are a valuable addition to any outdoor space.
With careful planning and execution, your garden can become a captivating retreat that extends your living space into the evening hours. Embrace the creative possibilities of garden lighting to transform your outdoor area into a place of beauty and relaxation.